
OpenGL 2D Facade (10): Layers
In this post, we extend the facade to handle several layers. We also see how to draw with transparency.
This post is part of the OpenGL 2D Facade series
Objective
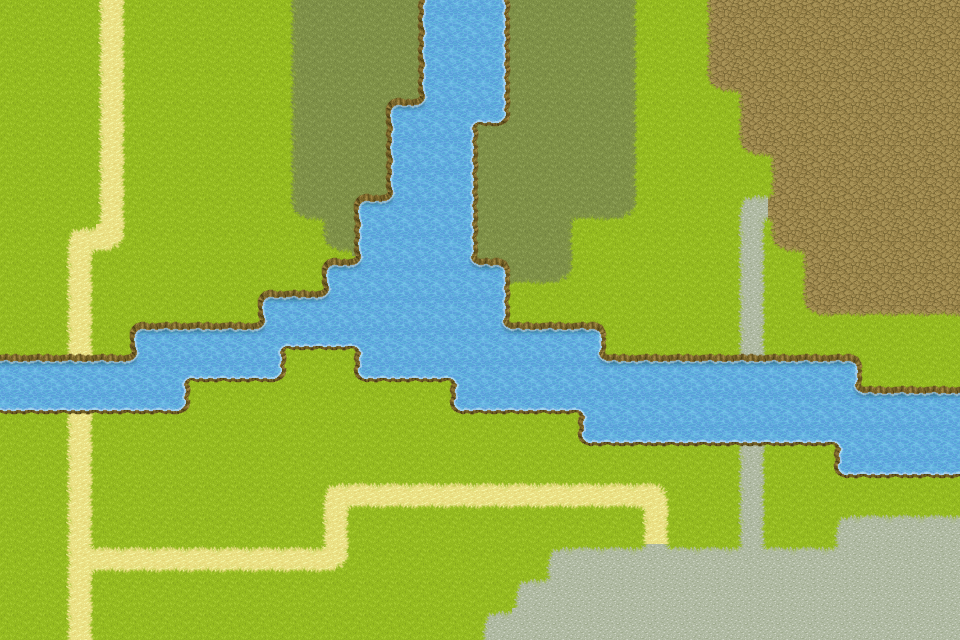
We aim to draw the water layer on top of the ground layer:

The water layer has empty cells; otherwise, we would not see the ground layer! In the level loader we previously implemented, we assigned empty cells to the bottom-right tile in the tileset, assuming that this tile is always fully transparent. As a result, as long as we handle well the alpha channel during the rendering, there is nothing to do for these empty cells.
Facade with layers
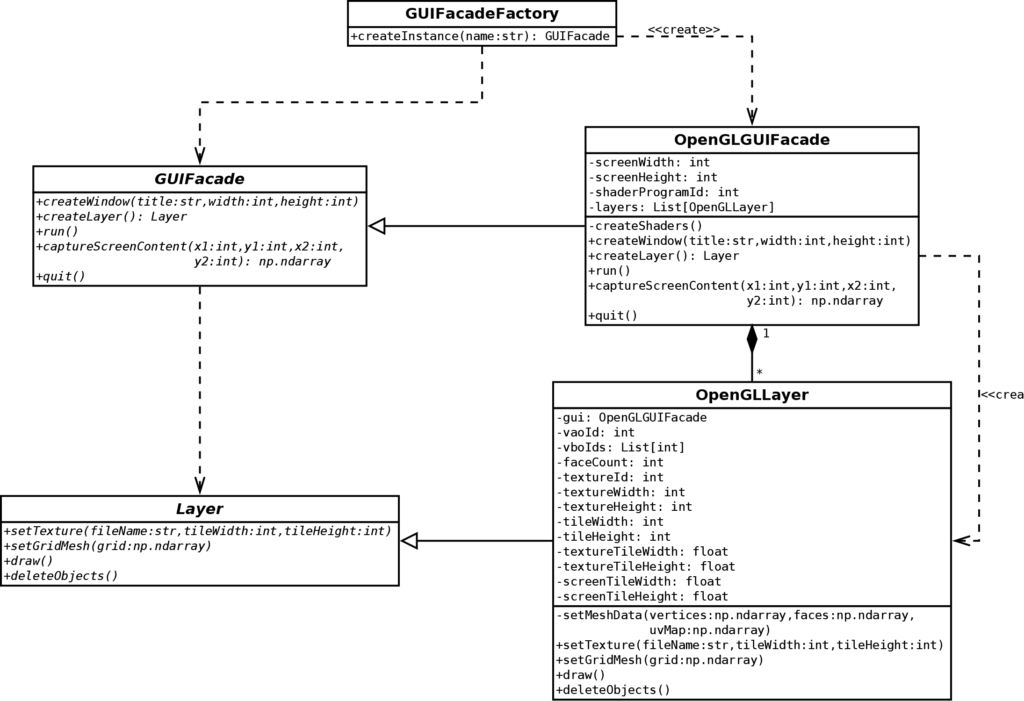
I propose to extend the previous facade with a new Layer class and its implementation with OpenGL:

We can see that many methods moved from the GUIFacade class to the Layer class (and similarly for their implementations). We can emphasis the following new methods and attributes:
- The
createLayer()method of theGUIFacadeclass returns a new instance of an implementation of theLayerclass. Note that it is an example of the Factory Method Pattern! - The
draw()method of theLayerclass renders the layer of the instance; - The
OpenGLGUIFacadeclass contains a list ofOpenGLLayerinstances in thelayersattribute; - The
OpenGLLayerclass contains an attributeguithat refers to the facade that owns the layer. Thanks to this attribute, the layer can ask for main properties, like the size of the screen.
Create a new layer
The creation of a new layer is straightforward: create a new instance, add it to the list of layers, and return it:
def createLayer(self) -> Layer:
    layer = OpenGLLayer(self)
    self.__layers.append(layer)
    return layer
Thanks to this method, the user of the facade can ask for a new facade using the createLayer() method. Then, he can set all its properties (like the texture) using the methods of the Layer class.
Render the layers
Since we keep track of all the layers in the attribute list, we can call their draw() method in the main game loop (inside the run() method of the OpenGLGUIFacade class):
def run(self):
    self.__createShaders()

    clock = pygame.time.Clock()
    running = True
    while running:
        for event in pygame.event.get():
            if event.type == pygame.QUIT:
                running = False
                break
            elif event.type == pygame.KEYDOWN:
                if event.key == pygame.K_ESCAPE:
                    running = False
                    break

        glClear(GL_COLOR_BUFFER_BIT)

        glUseProgram(self.__shaderProgramId)

        for layer in self.__layers:
            layer.draw()

        glUseProgram(0)

        pygame.display.flip()
        clock.tick(60)
Transparency
The alpha channel handles transparency: a value of zero means full transparency, and a value of one means full opacity. Values between these two extremes allow blending of different colors.
We already load and store texture with an alpha channel, so there is nothing to do at this point, except for the use of image files with an alpha channel.
OpenGL does not consider alpha channel upon initialization; it must be enabled (anywhere before the game loop, for instance, during the creation of the window):
glEnable(GL_BLEND)Then, we must select a blending function or how to use the alpha channel. There are many possibilities, I don't present all of them, and only consider the one of interest for our case:
glBlendFunc(GL_SRC_ALPHA, GL_ONE_MINUS_SRC_ALPHA)With this setting, the blending function is:
Cf = Cs * Sa + Cd * (1 - Sa)Where:
Cfis the output of the function, the color rendered on screen;Csis the color of the pixel to render;Sais the alpha value of the pixel to render;Cdis the current color on the screen.
Using this function, when the alpha value of the pixel to render is zero (full transparency), then the output is the color currently on the screen (no change):
Cf = Cs * 0 + Cd * (1 - 0) = CdWhen the alpha value of the pixel to render is one (full opacity), then the current color on the screen is replaced by :
Cf = Cs * 1 + Cd * (1 - 1) = CsAny alpha value between zero and one mixes the color on the screen and the one to render. Note that this blending function ignores the alpha value on the screen.
Program initialization
The initialization of the program changes a bit. Firstly, we load the level and decode the two first layers:
levelLoader = LevelLoader("level.tmx")
levelWidth = levelLoader.width
levelHeight = levelLoader.height
groundTileCoords, groundTexture, groundTileWidth, groundTileHeight = levelLoader.decodeLayer(0)
waterTileCoords, waterTexture, waterTileWidth, waterTileHeight = levelLoader.decodeLayer(1)
The creation of the window is as before:
guiFacade = GUIFacadeFactory().createInstance("OpenGL")
screenWidth = groundTileWidth * levelWidth
screenHeight = groundTileHeight * levelHeight
guiFacade.createWindow(
    "OpenGL 2D Facade - https://www.patternsgameprog.com/",
    screenWidth, screenHeight
)
The creation of the ground layer is straightforward: create a new instance, set the texture, and set the tiles:
groundLayer = guiFacade.createLayer()
groundLayer.setTexture(groundTexture, groundTileWidth, groundTileHeight)
groundLayer.setGridMesh(groundTileCoords)
We create the water layer in the same way:
waterLayer = guiFacade.createLayer()
waterLayer.setTexture(waterTexture, waterTileWidth, waterTileHeight)
waterLayer.setGridMesh(waterTileCoords)
If you want to add layers, create a new one with Tiled Map Editor, and repeat these sets of three lines!
Final program
In the next post, we'll see how to display a part of a level using views.