
Discover Python and Patterns (18): Layers
We got a background now, but we can get a better one with layers! Now that we saw the class inheritance, I can show you how to create and add new layers of different kinds easily.
This post is part of the Discover Python and Patterns series
Layers
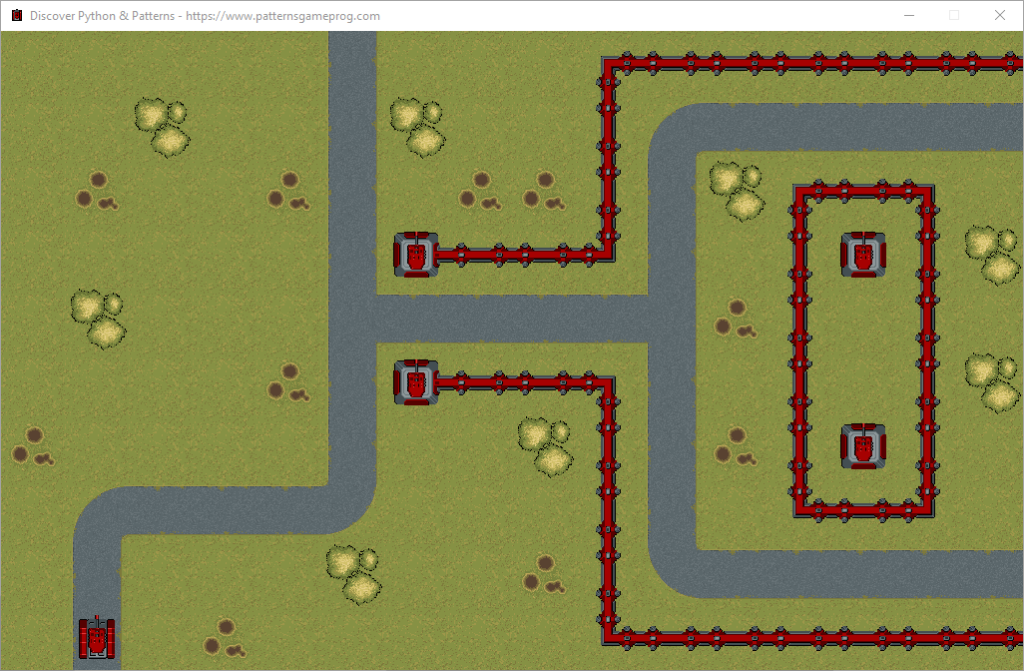
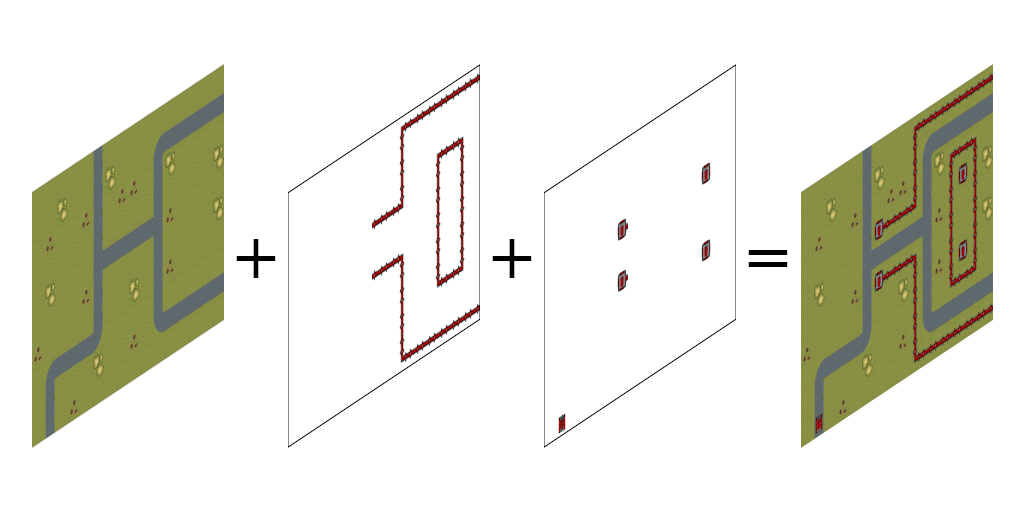
I wish to get the following visual result, where I add walls on top of the background:

I use three layers:

We could get such a result with a copy and paste of the code that renders the background. As usual, I prefer to show you how to do that in a more compact and extensible way.
Layer class hierarchy
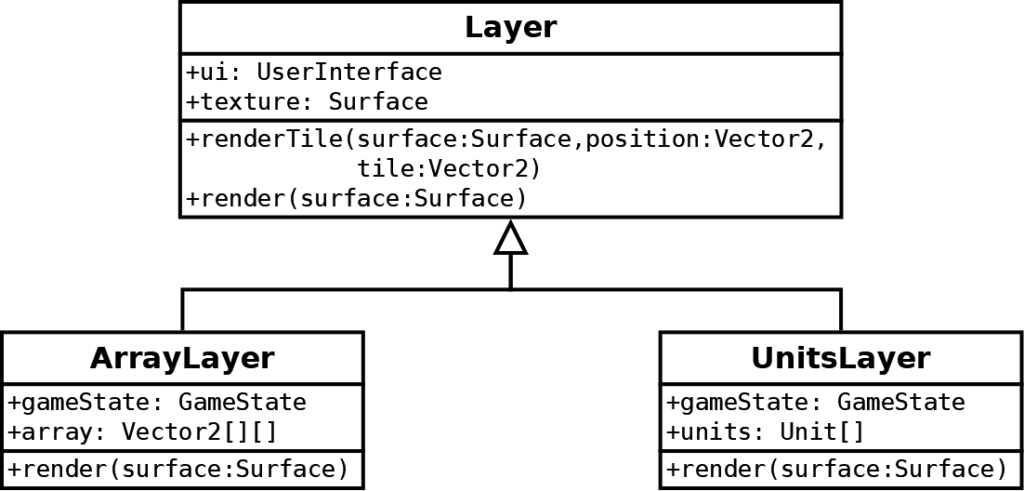
I propose to create three classes:

The Layer class is the base class that contains common attributes and functionalities:
- A
uireference to theUserInterfaceto access data like the size of cells; - A
texturePygame surface that contains the image tileset; - A
renderTile()method that can draw a tile from the texture anywhere on a surface; - A
render()method that we can call to render the layer in a surface. Child classes must implement this method.
The ArrayLayer child class renders layers based on a 2D array, like the background we added in the previous post. It contains the following members:
- A
gameStatereference to aGameStateto access data like the size of the world. Note that it is not in the base class because we could create layers that need no access to a game state; - A
arrayreference to a 2D array of Pygame Vector2, like the one we created in theGameStateclass for the background; - A
render()method that renders the layer using the 2D array.
The UnitsLayer child class is similar to the ArrayLayer class, except that it references a list of instances of the Unit class.
The Layer class
I propose the following implementation for the Layer class:
class Layer():
    def __init__(self,ui,imageFile):
        self.ui = ui
        self.texture = pygame.image.load(imageFile)

    def renderTile(self,surface,position,tile):
        # Location on screen
        spritePoint = position.elementwise()*self.ui.cellSize

        # Texture
        texturePoint = tile.elementwise()*self.ui.cellSize
        textureRect = Rect(int(texturePoint.x), int(texturePoint.y), self.ui.cellWidth, self.ui.cellHeight)

        # Draw
        surface.blit(self.texture,spritePoint,textureRect)

    def render(self,surface):
        raise NotImplementedError()
The constructor (e.g. the __init__() method) creates the two attributes. We load an image file into the texture attribute: when using this constructor, we only need to give the name of the image file.
The renderTile() method is like we did many times in previous posts to render a tile from a tileset. This time, it will be the only location in the program where you see such a code!
The render() method raises an exception: child classes must implement it.
The ArrayLayer class
This class is easy to implement:
class ArrayLayer(Layer):
    def __init__(self,ui,imageFile,gameState,array):
        super().__init__(ui,imageFile)
        self.gameState = gameState
        self.array = array

    def render(self,surface):
        for y in range(self.gameState.worldHeight):
            for x in range(self.gameState.worldWidth):
                tile = self.array[y][x]
                if not tile is None:
                    self.renderTile(surface,Vector2(x,y),tile)
The constructor expects four arguments: the two arguments from the base class constructor (ui and imageFile) and the two arguments for the specific attributes of this class (gameState and array).
Note the first line of the constructor:
super().__init__(ui,imageFile)It is the syntax to call a method from the base class (or "super" class). You can do the same for any other base method, for instance, if you want to call the render() method of the base class:
super().render(surface)The render() method is similar to the block in the previous render() method of the UserInterface class. The main differences are:
- It is no more limited to the
ground2D array of the game state, now layer of this type can render any 2D array; - It handles empty cells in the array: if there is a
Nonevalue, which means "nothing" or "empty" in Python, then nothing is rendered.
The UnitsLayer class
The implementation is this class is almost the as ArrayLayer, except that we are working with a list of Unit instances instead of a 2D array of Vector2:
class UnitsLayer(Layer):
    def __init__(self,ui,imageFile,gameState,units):
        super().__init__(ui,imageFile)
        self.gameState = gameState
        self.units = units

    def render(self,surface):
        for unit in self.units:
            self.renderTile(surface,unit.position,unit.tile)
            self.renderTile(surface,unit.position,Vector2(0,6))
Note that we call the renderTile() method twice: the first time for the unit base and the second time for the weapon.
The GameState class
In the GameState class, I only add a new 2D array for the walls:
def __init__(self):
    self.worldSize = Vector2(16,10)
    self.ground = ...
    self.units = ...
    self.walls = [
        [ None, None, None, None, None, None, None, None, None, Vector2(1,3), Vector2(1,1), Vector2(1,1), Vector2(1,1), Vector2(1,1), Vector2(1,1), Vector2(1,1)],
        [ None, None, None, None, None, None, None, None, None, Vector2(2,1), None, None, None, None, None, None],
        [ None, None, None, None, None, None, None, None, None, Vector2(2,1), None, None, Vector2(1,3), Vector2(1,1), Vector2(0,3), None],
        [ None, None, None, None, None, None, None, Vector2(1,1), Vector2(1,1), Vector2(3,3), None, None, Vector2(2,1), None, Vector2(2,1), None],
        [ None, None, None, None, None, None, None, None, None, None, None, None, Vector2(2,1), None, Vector2(2,1), None],
        [ None, None, None, None, None, None, None, Vector2(1,1), Vector2(1,1), Vector2(0,3), None, None, Vector2(2,1), None, Vector2(2,1), None],
        [ None, None, None, None, None, None, None, None, None, Vector2(2,1), None, None, Vector2(2,1), None, Vector2(2,1), None],
        [ None, None, None, None, None, None, None, None, None, Vector2(2,1), None, None, Vector2(2,3), Vector2(1,1), Vector2(3,3), None],
        [ None, None, None, None, None, None, None, None, None, Vector2(2,1), None, None, None, None, None, None],
        [ None, None, None, None, None, None, None, None, None, Vector2(2,3), Vector2(1,1), Vector2(1,1), Vector2(1,1), Vector2(1,1), Vector2(1,1), Vector2(1,1)]
    ]
The improvement made with the Layer class hierarchy has no impact on the GameState class. We can improve this class and the initialization of the arrays loading levels from a file: I'll show that in the next posts.
The UserInterface class
In the constructor of the UserInterface class, we can add a list of layers:
self.layers = [
    ArrayLayer(self,"ground.png",self.gameState,self.gameState.ground),
    ArrayLayer(self,"walls.png",self.gameState,self.gameState.walls),
    UnitsLayer(self,"units.png",self.gameState,self.gameState.units)
]
It is like we did for the units in the GameState class: we can create a list of any size, and then the chosen class of each item defines its behavior.
For the rendering, we no more need the renderGround() and renderUnit() methods. To render everything, we only need the following render() method:
def render(self):
    self.window.fill((0,0,0))

    for layer in self.layers:
        layer.render(self.window)

    pygame.display.update()
Pay attention to the for statement: it is the same idea as with the update of units in the GameState class. For each layer in our layers list, we ask for rendering in the window's surface. At this point, we don't need to worry about the type of layers in the list. We could change them, create or delete new layer classes; these lines still work.
Final program
You can see the final code and try it here:
In the next post, I propose to use the mouse to orient the weapon of our tank.